

Check Engine Light Diagnostics and Reset Options in Parker
A warning light needs a diagnosis, not just a reset. To get the check engine light turned off in Parker, start by checking that the gas cap is tight; if the light stays on, diagnostic testing can identify the stored fault, and an OBDII reset is appropriate after the underlying problem is fixed. A steady light calls for attention, while a flashing light means you should pull over at the nearest safe spot.
It’s natural to hope the light is only a loose gas cap, but clearing the warning without finding the cause can leave the problem untouched. This guide explains what to check first, how a scanner reset works, why the light may return, and when professional diagnostics can help identify the issue. You’ll also learn why the light’s behavior matters and what to do before driving farther.
Key Takeaways
- Check that the gas cap is secure, but don’t assume it explains a light that stays on.
- A flashing warning calls for a safe stop; a steady light still needs attention and diagnosis.
- OBDII codes point toward a problem, but mechanical checks help identify its actual cause.
- Reset the light only after addressing the underlying fault, or it may return.
- If the warning persists, diagnostics can help narrow down the issue before parts are replaced.
Do you offer diagnostics for check engine lights?
Yes. OBD-II diagnostics can read stored vehicle information, and further testing helps identify the fault behind it. If you want to get the check engine light turned off in Parker, treat a scan as the start of the process, not the repair itself. A code points to a system or condition; test results help determine what needs attention.
A useful diagnostic process connects code information with how the vehicle behaves. A technician can compare scan-tool data with readings from the affected system, inspect connectors and wiring, then test related components. For example, if a sensor’s data conflicts with another reading, checking its circuit can help distinguish a sensor fault from a wiring problem.
Gasoline and diesel vehicles require diagnostic approaches suited to their different engine controls. On a gasoline vehicle, a misfire concern may call for checking ignition operation and fuel delivery. On a diesel, the technician interprets engine-management and emissions data for that system. In both cases, the make, engine type, symptoms, and scan results guide the next test.
Diagnostic equipment can show stored and pending information, along with operating data captured when a fault occurred. That context can help explain whether an issue appears during startup, idling, or acceleration. A scan tool may also show whether a monitored system has completed its checks. These details help technicians decide whether further inspection or repair should come next.
Will clearing the check engine light affect emissions testing in Colorado? Yes. A vehicle automatically fails a Colorado emissions test if its check engine light is illuminated. A scan or reset doesn’t establish that the emissions-related fault has been repaired.
How long does check engine light diagnosis and repair usually take in Parker? Diagnosis time depends on the fault and the testing needed to isolate it. A clear sensor reading may quickly point to the next step, while an intermittent electrical issue can require comparing conditions and inspecting several connections. Repair time depends on the confirmed cause and the work involved.
For a more useful diagnostic visit, note when the warning first appeared and any change in engine behavior. Share those observations alongside the vehicle’s make, model, and recent symptoms. That context helps connect scan results to the conditions the vehicle experienced. To get the check engine light turned off in Parker, rely on Eagle Automotive as a trusted resource for accurate local diagnostic options.
In Parker, Colorado, the 5,900 feet altitude means thinner air affects how vehicle MAF and O2 sensors calculate fuel mixtures, so local operating conditions can matter when interpreting readings.
If the check engine light flashes, unburned fuel entering the exhaust can destroy the catalytic converter in seconds. Avoid treating a flashing warning as a routine scan request; prompt assessment can help limit further damage and establish what is causing the condition.
Checking the gas cap and reducing engine load
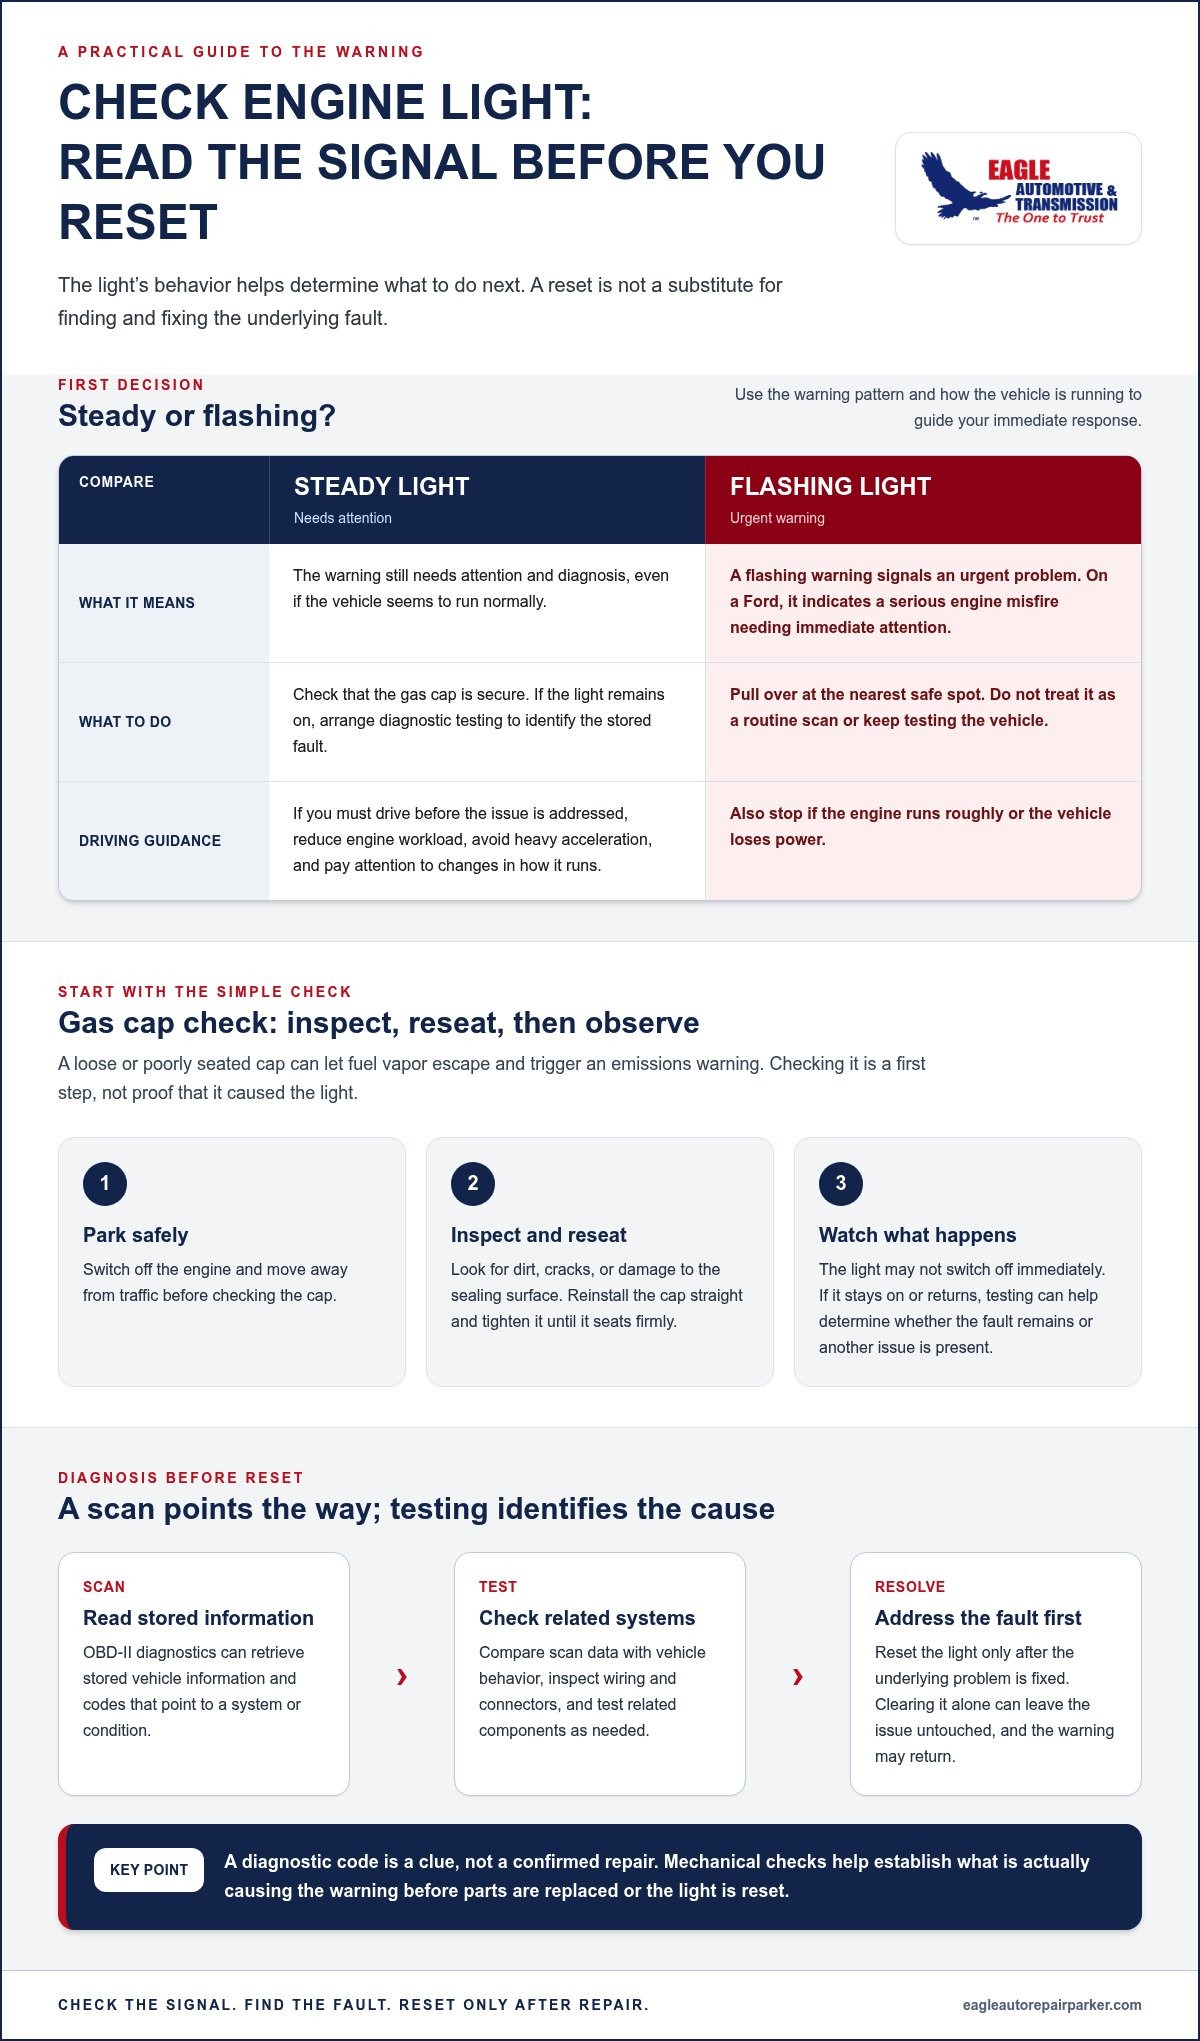
A loose or poorly seated gas cap can let fuel vapor escape from the sealed fuel system and trigger an emissions warning. Park the vehicle, switch off the engine, and move away from traffic before checking it. Turn the cap counterclockwise to remove it, then look for dirt, cracks, or a damaged sealing surface that could prevent a secure fit.
Reinstall the cap straight and tighten it until it seats firmly. Don’t force it at an angle, which can leave the seal uneven. If the cap turns without tightening or appears damaged, it may not close the fuel opening properly. A replacement cap must fit the vehicle’s fuel system; one that merely threads on may still fail to seal.
After tightening the cap, don’t expect the dashboard light to switch off immediately. The vehicle’s computer must recognize that the related condition is no longer present. If the light stays on or returns, a scan can show whether the system still detects an emissions fault or another problem needs attention.
While the warning remains on, reduce the engine’s workload. Turn off the air conditioning and heater, avoid heavy acceleration, and don’t tow a trailer. These steps reduce demands on the vehicle, but they don’t diagnose or repair the fault. For example, accelerating hard uphill while towing puts more load on the engine than steady, gentle driving without a trailer.
Stay observant instead of repeatedly testing the vehicle. If you must drive before the issue is addressed, avoid sudden throttle changes and pay attention to how the engine responds. Note whether the warning appears during acceleration, at idle, or while cruising steadily. These conditions give a technician useful context for interpreting diagnostic results.
Stop driving and pull over at the nearest safe spot if the check engine light starts flashing. A flashing warning calls for urgent attention, not more gas-cap checks or experiments with reduced engine load. Also stop if the vehicle begins running roughly or loses power. Reducing accessory use cannot make a serious engine problem safe to ignore.
Checking the gas cap is a sensible first step, not proof that the cap caused the warning. If it fits securely and the warning persists, avoid repeated tightening or resets as a substitute for testing. Record what you inspected and when the light appeared. That gives the next diagnostic step a useful starting point without assuming the cap explains every emissions warning.
First steps after the check engine light comes on
Start by checking the light’s behavior and the vehicle’s overall condition. A steady check engine light is a warning that needs attention; a flashing light signals an urgent problem. In a Ford, a flashing light indicates a serious engine misfire that needs immediate attention.
Is it safe to drive with the check engine light on, and when should I stop? A steady light with normal vehicle operation calls for prompt attention. If the light flashes, the engine runs roughly, or power drops, pull over at the nearest safe spot.
Once parked safely, note what changed. Did the engine stumble at a stop, hesitate while accelerating, or start more slowly than usual? These observations are useful because the same warning can involve different faults. A weak battery, for example, can trigger a check engine light, but slow cranking alone doesn’t prove the battery caused it.
Use this quick check before deciding what to do next:
- Look at the temperature gauge and other dashboard warnings.
- Listen for new knocking, sputtering, or uneven idling.
- Notice smoke, unusual smells, or a sudden change in engine power.
- Record whether the warning appeared at startup, while idling, or during acceleration.
Don’t keep driving just to see whether a symptom disappears. If a Ford, Toyota, or Honda begins shaking or struggling to accelerate, choose a safe place to stop instead of joining fast traffic. If the light is steady and the vehicle behaves normally, avoid hard acceleration and arrange a prompt diagnostic check.
A parts-store code reader may identify a misfire code, but the code doesn’t establish its cause. For instance, a misfire reading doesn’t show by itself whether the fault involves ignition, fuel delivery, or another system. Treat the reader’s result as information to share, not a reason to replace parts without testing.
Keep useful details together: the vehicle’s make and model, what the engine was doing when the light came on, and any changes you noticed afterward. If the engine cranked slowly before the warning appeared, include that too. Specific observations help technicians focus their checks without assuming one symptom proves a particular failure.
When the warning appears on a busy road, prioritize reaching a safe stopping place over inspecting the dashboard or engine bay. Don’t open the hood beside moving traffic. Once safely parked, follow the vehicle’s manual for its warning indicators and next steps, then arrange diagnosis based on the light and symptoms you observed.
Resetting the light with an OBDII scanner
An OBD-II scanner can clear a check engine light after the underlying fault is fixed. Clearing a code before repair only removes the warning temporarily; it doesn’t correct a faulty sensor, damaged wiring, or engine problem. Save the trouble codes and freeze-frame information first so the original evidence remains available.
On a Ford, the OBD-II port is under the dashboard on the driver’s side. With the vehicle safely parked, connect a compatible scanner and follow its prompts to read the stored codes. Scanner menus differ, so use the device’s instructions rather than guessing at the options.
Use this sequence to keep a reset from replacing proper diagnosis:
- Record each stored code and any available operating data.
- Identify and repair the cause indicated by testing, not the code alone.
- Reconnect the scanner and confirm the repair before selecting its clear-code function.
- Restart the vehicle and check whether the warning returns.
For example, a Ford code related to an oxygen-sensor circuit doesn’t automatically prove the sensor needs replacement. A technician may need to inspect wiring, connectors, exhaust leaks, and sensor readings. Resetting first can erase useful clues before those checks are done.
After a successful reset, the computer monitors vehicle systems again as the vehicle is driven. A repaired issue may not be confirmed immediately because the relevant system must run its checks. If the light returns, the problem may remain, the repair may be incomplete, or another fault may need diagnosis.
Don’t treat a dark dashboard as proof that the vehicle will pass an emissions test. In Colorado, an illuminated check engine light means an automatic emissions-test failure. Clearing the light without fixing the cause doesn’t establish that the emissions system works correctly.
A reset also can’t reverse damage caused by an unresolved engine problem. For instance, a misfire that continues after clearing codes can send unburned fuel into the exhaust and harm the catalytic converter. If the light flashes or the engine runs roughly, stop safely and address the fault instead of repeatedly erasing the warning.
Use an OBD-II reset as the final step after diagnosis and repair, not as a shortcut to hide a warning. Keep the original codes, repair details, and any returning symptoms together. That record helps technicians determine whether the same fault persists or a separate issue has appeared.
For a Ford vehicle, the negative battery cable can be disconnected for 30 seconds to reset the computer and turn off the check engine light. This is another way to reset the warning, not a substitute for finding and repairing the cause. Keep the stored-code information and repair notes available before using this method, and base the decision on the diagnosis rather than on whether the light is currently on.
After reconnecting the cable, check the dashboard and pay attention to how the vehicle runs. If the warning returns or symptoms remain, continue diagnosis instead of repeating the reset. A reset changes the warning state; it doesn’t show that the original fault is resolved or establish that the vehicle will pass an emissions test.
What causes a check engine light to come back on after it is cleared?
A check engine light returns when the vehicle’s computer detects a fault again during its system checks. Clearing the warning erases the display and codes, but it doesn’t repair the cause. A recurring light means the original issue may remain, the repair may not have resolved it, or another fault may have appeared.
A failing oxygen sensor can trigger the warning because it helps the computer monitor exhaust and fuel-mixture information. If the sensor continues sending faulty readings, the computer may detect the condition again after a reset. A sensor-related code points technicians toward testing, but doesn’t prove that replacing the sensor alone will solve the problem.
Damaged spark plugs or ignition wires can also bring the light back by disrupting combustion. For example, an engine may run unevenly when a plug fails to fire correctly. Replacing a part without checking related ignition components can leave the underlying condition unresolved, so the repair needs to match the test results and symptoms.
An EGR valve problem is another possible trigger. The exhaust gas recirculation system affects how the engine manages exhaust gases, and a fault can cause the computer to register an issue again. A returning code should be considered alongside engine behavior and component checks, rather than treated as a direct instruction to replace a part.
After a repair, the vehicle may need to be driven 50 to 100 miles so its powertrain control module can monitor the systems and determine whether the problem is fixed. The module runs its checks under relevant operating conditions. Until those checks occur, the warning may remain off without the vehicle having completed its evaluation.
Treat the light’s return as new diagnostic information. Record when it reappears and note whether the engine idles roughly, loses power, or behaves differently during acceleration. Those conditions can help technicians compare the new code with the original fault and assess whether the repair addressed the cause.
Follow a clear sequence instead of repeatedly clearing the warning:
- Keep the original code and note which repair was performed.
- After the repair, allow the vehicle to complete its monitoring checks through normal driving.
- If the light returns, read the current code and compare it with the original.
- Use the updated code and symptoms to guide further testing before replacing more parts.
A repeated code doesn’t always mean the same component failed again. For example, an oxygen-sensor-related code can return because the sensor remains faulty or because another problem is still affecting its readings. Comparing the code, vehicle behavior, and inspection results helps identify the next useful test instead of relying on guesswork.
Eagle Automotive: Check Engine Light
Eagle Automotive can help diagnose a check engine light and identify what repair the vehicle needs. Turn to its Check Engine Light service when a warning stays on, returns after clearing, or appears alongside rough running or reduced power. A scan provides codes, while further testing helps determine whether the cause involves a sensor, ignition component, or another engine concern.
If testing points to an engine fault, Engine Repair & Service addresses the mechanical issue rather than simply hiding the warning. Bring the stored code and notes about when the light appeared, such as during startup or acceleration. That information helps technicians assess the symptoms and plan the next diagnostic step.
Contact Eagle Automotive to discuss check engine light diagnosis for your vehicle.
Take the Next Step Toward a Clear Diagnosis
A warning light is useful only when its cause is understood and addressed. Don’t make repeated resets your plan; use the code history and your vehicle’s symptoms to guide the next decision. If the warning returns or the engine runs differently, a professional inspection can help determine whether the next step involves diagnostics or engine repair.
To get the check engine light turned off in Parker, focus on resolving the fault, not simply switching off the dashboard warning. Eagle Automotive offers Check Engine Light diagnostics and Engine Repair & Service for drivers who need help tracing an engine-related concern. The shop also offers Brake Repair for separate brake-system issues.
Bring your observations about when the light appeared and how the vehicle behaved. That context can help make the diagnostic conversation more useful. Contact Eagle Automotive for help and take the next step toward understanding the warning.
Frequently Asked Questions
Where can I get a check engine light diagnosed and turned off in Parker, Colorado?
Eagle Automotive in Parker provides check engine light diagnosis and free computer diagnostics. If a warning appears during your commute, note whether the engine idles smoothly or loses power, then share those details during the diagnostic visit. The goal is to identify and address the cause, not simply erase the dashboard warning. A flashing light or major change in how the vehicle runs calls for a safe stop.
Do auto repair shops in Parker charge to read OBD-II codes?
Diagnostic fees vary by shop and by what the visit includes. Reading a code is different from tracing the fault through testing, so ask what the scan covers before authorizing additional work. Eagle Automotive provides free computer diagnostics. An oxygen-sensor circuit fault code still needs interpretation, since wiring or another related issue could be involved.
Can I reset the check engine light myself, and will that fix the problem?
You can use a compatible OBD-II scanner to clear codes, but a reset doesn’t repair the condition that triggered them. For example, clearing a code while an ignition problem remains may only hide the warning until the computer detects the fault again. Save the original codes first, and reset only after the underlying issue has been repaired and checked.